Pages

Sunday, February 2, 2014

Chicken Drumsticks Curry

My mom never cooked chicken, so that's something I learnt on my own by looking up recipes online. After cooking the easy chicken breast several times, it was finally time to move up to the juicy chicken drumsticks. I found this simple but extremely delicious recipe on youtube. Eat East Indian's video is quite elaborate with step by step instructions - just follow them and you are all set!

P.S: Please excuse my pictures, as am still learning the works of my new camera. :D


Recipe

Ingredients

chicken drumsticks - about 6 (cleaned)
one large onion - cubed
two medium tomatoes - cubed
slit green chillies - 2
ginger - 1 tsp, finely chopped
garlic - 1 tsp, finely chopped
kasoor methi - 1 tsp (optional)
cream/milk - 1 to 2 tbsp (optional)

Spices:
cumin seeds - 1 tsp 
fennel seeds - 1 tsp (optional)
turmeric powder - 1 tsp
chilli owder - 1 to 2 tsp
black pepper powder - 1 tsp
coriander cumin powder - 1 tsp
salt as per taste

For garnishing:
half lemon
chopped coriander leaves

oil for cooking


Method

- Heat oil in your cooking vessel and first sauté the onions along with cumin seeds, green chillies, ginger and garlic. Sauté until the onions are golden brown. Add some salt to help the onions cook faster.
- Add all the spices, fennel seeds and fry for a couple of mins.
- Add the chicken drumsticks and cook on high for about 8 - 10 mins, constantly stirring so it's not burnt. Lower the flame and cook covered for another 5 mins until the chicken leaves clear water.
- Next add the tomatoes, about a cup of water and the cream. At this point I add about a tsp of crushed kasoori methi, because I love the aroma and the flavor it adds to the dish. Cook covered for good 15 mins until the chicken has cooked completely. Don't forget to check the status in between! 
- Garnish with lemon juice and coriander and RELISH! 
- Eat East Indian's recipe calls for potatoes, but I typically don't add them. 


Wednesday, January 1, 2014

Saaru Upkari (Black Eyed Peas Soup)

Happy New Year all! The last and only konkani dish I have posted so far was the spicy and tangy batate song (potato gravy). I am going to make a conscious effort to post more konkani dishes - really simple ones. Coz honestly, I can't make the traditional konkani dishes that typically involve the coconut. :| I think it's high time I learnt them - but the husband isn't a fan of the coconut - ARGH!

Saaru upkari is a really simple konkani dish and can be made with any dried beans like white peas, navy beans, chick peas - etc. Saaru in konkani means soupy water, like rasam. Upkari is sabzi or stir fry. So, this combines both in a single dish! One of the reasons I like this recipe is that it doesn't need a lot of ingredients and you don't need to constantly stand near the stove and monitor it.


Recipe

Prep Time: 10 mins
Cooking Time: 20 mins
Serves: 2-3

Ingredients

Dried beans of your choice - 1 cup (I typically use black eyed peas)
Green chillies, slit - 2
Water - 1 to 2 cups (depends on how much soup you want)
Salt to taste

For seasoning
Dried red chillies, broken - 2/3
Garlic pods, chopped - 2 big ones. Garlic is the key ingredient here, so don't be afraid to add a strong seasoning!
Oil - 1 tsp

Method

- Soak the beans overnight or at least for about 8 hrs. Pressure cook them until soft and mushy.
- Take the cooked beans in a sauce pan, add the slit green chillies, water and salt.
- The dried beans are pretty bland on their own, so make sure you bring it to a good boil. I let it boil at least for 5 mins on a high flame and then simmer on low for another 10 mins. Don't forget to stir in between and you can even mash the cooked beans slightly with your spatula.
- For the seasoning, heat a tsp of oil and add the chopped garlic. Let it brown slightly and then add the dried red chillies, allowing it to fry a bit.
- Add it to the saucepan, switch off the flame and let the cooked beans soak in all the flavors.

Have it with rice and pappad. I usually devour this as soup with just a few rice grains and lots of pappad pieces! Yummmmm!


Sunday, December 15, 2013

Su's lil bag of goodness

I am always hungry at work and it's hard to snack healthy all the time. I try. Most times I end up at the PRET A MANGER's store below my office and pick up their chocolate trail mix. It's a lil bag of goodness, as they like to call it - that contains black raisins, raw almonds, cashews & sunflower seeds and some semi sweet chocolate for some good measure. Since I snack on these very often - I decided to make them on my own and carry it in my handbag. So now, I always have something to munch when am on the go plus these nuts are extremely healthy - packed with the "good" fats, omega 3 fatty acids & fiber to name a few.


Here's what you need to create your own lil bag of goodness.

Recipe

Prep Time: Absolutely negligible!
Cooking Time: Nada

Ingredients

Dried fruits of your choice (raw almonds, cashews, walnuts, raisins, cranberries, pistachio, etc.) - 1 to 2 handfuls each
Choc chips (semi sweet or dark, I used Ghirardelli's semi sweet choc chips) - 1 handful

Method

Mix all the ingredients together and pack them in snack or quart sized ziplock bags and you are all done! 

On a separate note - we got a brand new DSLR camera. A Canon Rebel T5i with a 18 - 135mm lens. (I actually know what that means now!) Hubby and I are pretty excited about the new gadget and have been taking turns to get familiar with it. Here's one of our first attempts. Hoping to use it to take more pictures for this blog. :)


Friday, November 29, 2013

Thanksgiving meal

Happy Turkey Day, everyone! I would like to start this post by giving thanks. I am thankful that I am healthy and live a really beautiful life with my darling husband. I am thankful that I have a loving family that has extended after my wedding. I love my job and am thankful for that!

We are celebrating the American holiday by having one of our couple friends over. The menu for the day is Indian. Sorry, no turkey cooking in my kitchen. I ain't a big fan of the bird! So, here's what we are making today. (Hubby really helps in the kitchen now by chopping and cleaning, so he deserves due credit).


-- Egg Puffs
-- Fish Fry 
-- Simple Veg Biryani 
-- Raita

Egg puffs
Fish Fry
Veg Biryani

I was also supposed to get some baked goodies from the bakery nearby, but thanks to the crappy weather and my recovering cold - I didn't put in the extra effort to make the short trip. :| But our friends got some delicious Ras Malai. 

Verdict - the egg puffs and the fish fry were a big hit! Our friends really seemed to like it.

Hopefully I will have the recipes for all the items very soon on my blog. :) 

Have a great thanksgiving, all! 

Sunday, November 17, 2013

Pompano (Pomfret) Fish Fry

It's been a while since my last post. I need to be more regular at this! I take pictures of the food I make and eat at restaurants all the time, in hope that I use them more regularly for my blog. :D

I've grown up eating fish, and thankfully so has the husband. And we are both crazy about fish fry. My mum, and my MIL make excellent fish fry, that's to die for!

It's only been 2 yrs since I started cooking fish. I initially started with Tilapia and Catfish fillets as I couldn't find any of the fish we typically ate back home in India. Which were mostly the Pomfret, Kingfish, Indian Anchovies and maybe King Mackeral. But one day I discovered Pompano (which belongs to the same family as the Pomfret and the taste is quite close to it) here in China Town and was super excited! Now we visit China Town very often and bring a few pounds worth of Pompano, which they cut and (superficially) clean as well. Yay!

My mom's recipe is really simple and yet tastes out of this world. I add a few extra ingredients to add some more flavor. Hubby absolutely loves it!


Recipe

Prep Time: 10 mins (assuming you have cleaned the fish already!)
Cooking Time: 10 mins

Ingredients

Fish - 1lb, cleaned (you can use any fish you like, but this recipe uses thin cut slices of Pompano)

For the paste:
chilli powder - 2 to 3 tsps
pepper powder - 2 tsps
turmeric powder - 1/2 tsp
ginger garlic paste - 1 tsp (optional)
lemon juice - 2 tsps
curry leaves - 4 (optional)
salt as per taste

To coat:
rice flour - 2 to 3 tsps
rava - 1 tsp

To shallow fry:
Oil - 2 to 3 tsps

Method

- Mix all the ingredients listed under paste. The lemon juice should be enough to form a uniform paste, but you can add a few drops of water, if needed.


- Coat your fish pieces evenly with this paste and keep aside for at least 30 mins to an hour.
- I typically marinade about 6 pieces at a time and leave them overnight in the fridge. I then cook 2 at a time, so we have it for a few meals.


- To cook the fish, heat the oil in a pan on a medium flame. You don't want the oil to be very hot.
- While the oil is heating, coat the fish on both sides with the rice flour & rava mixture. This helps in getting a crisp texture.
- Shallow fry the fish on each side, again on a medium flame. The cooking time will vary depending on the type and size of the fish. These pompano pieces take around 5 mins per side.


- Take out the pieces on a paper towel and get ready to pounce on them! :D


Note: Adjust the spice level as per your taste. I have a high threshold for spice, so I use quite a bit of chilli p. and pepper. It might take a few attempts to know what's the right balance of ingredients you need for a particular type of fish. So, keep trying, the results are absolutely worth it!


Sunday, September 29, 2013

Bear Mountain State Park

This was the second time we were going hiking in a month and I was pretty excited! Bear Mountain State Park was recommended by the hubby's colleague and it had also shown up in my fall research.

The state park is under an hour from Jersey city. This time I didn't make anything for the trip, so we picked up egg and cheese sandwiches from a cafe near by and headed out right on time.

Our drive was through NYC, and once we hit the Palisades Avenue it was extremely beautiful with lush green trees leaning on both sides of the highway. Some of the trees had a tinge of yellow, so Fall is surely coming!  

Palisades Interstate Parkway

There are a couple of scenic overlooks on the Palisades Interstate Parkway, and we ended up stopping at the state line outlook for some quick pictures. We got a pretty good view of the Hudson River and Connecticut on the other side. It turned out to be a cloudy day, so some of the pictures lack sufficient natural light. Several bird watchers had stationed themselves at this outlook and were apparently tracking the migration of some of the birds to South America! Pretty cool stuff, in my opinion.  


Hudson river

The state park was quite crowded, with lots of people out to picnic. We took a stroll around the Hessian Lake. The easy trail was about 1.5 miles long. The state park was also hosting Oktoberfest - so there were lots of shops, food and of course - beer! I happened to find a nice lil piece of jewelry for myself and was delighted! 

Willkommen to Oktoberfest 2013
The stroll was extremely scenic, and we got some decent pictures of the lake with the mountain behind it. Reminded me a bit of Lake George, but the Adirondack mountain range was much bigger.

The trail around Hessian Lake 

A view of the lake

On our way out of the state park, we drove up the Perkins Memorial Drive to get to the mountain peak. We climbed all the way up to the tower to get a 360 degree view of the area. We could also spot NYC in the distance. We spent some time on the peak, soaking in the beautiful moments and views of the mountains. It was beautiful! 

Perkins Memorial Tower

View from the tower

Mountains overshadowed by the clouds

It was finally time to head back home - and guess what - the sun finally came out! Wish it had been sooner. Oh well, a great trip nonetheless - would definitely want to go back in the fall. :)

Wednesday, September 18, 2013

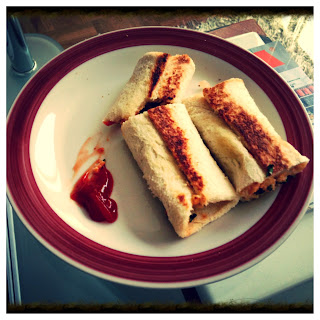
Paneer Bread Rolls

I am not sure how I came across this recipe from Edible Garden, but I am so glad I did! This snack is super easy, quick to make and quite tasty! Hubby liked it so much the first time I tried it, that he requested for it the next week and I gladly obliged! :)

Here's a look at the delicious evening snack!

Apologies for the half bitten roll, couldn't resist having a bite before taking the pic! :D

Recipe

Prep Time: 20 mins (including the 10 mins resting time for the rolls)
Cooking Time: Under 10 mins

Ingredients

Bread slices - 4
Paneer, crumbled - 1 cup
Half an onion, finely chopped

For seasoning (adjust as per taste)

chilli powder - 1/2 tsp
coriander-cumin powder - 1/2 tsp
garam masala powder - 1/2 tsp
ginger garlic paste - 1/2 tsp
Few strands of coriander, finely chopped
Tomato Ketchup - 1 to 2 tsp
Salt as per taste

Butter for toasting

Method

- Take the crumbled paneer, onion along with the ingredients listed under seasoning in a bowl and mix well with your fingers.
- You can taste the mixture and adjust the seasoning like I mentioned earlier. Keep aside.
- Take your bread slices and cut off the edges.
- Flatten them out with a rolling pin.
- Place about 2 tsps of the paneer mixture into each bread slice and roll it nicely. Make sure to place the folding at the bottom, so the bread roll doesn't open out.
- Cover the bread rolls in a moist paper towel for about 10 mins. This helps in getting the bread rolls a bit moist and binds everything together.
- Now for the best part! Butter up the bread rolls on all sides and toast it on your pan. Toast it on a medium flame, so the bread rolls can spend time on the pan. This will warm up the paneer mixture in the rolls as well.
- Serve with ketchup or with Sriracha sauce if you need to add a lil spice kick to your paneer bread roll!